How to Install Vinyl J Trim Around Windows
J-channel is an essential piece of trim. When these pieces are damaged or broken, you need to replace them to protect your home. You want to be sure to fix these trim pieces sooner rather than later.
But don't worry, replacing J-channel does not mean removing or replacing your vinyl siding. It's easy to replace these trim pieces without disrupting your home's exterior too much.
The process for installing J-channel under existing vinyl siding is simple. However, you only have two options once your siding is in place.
- Cut the punctured edge of your J-channel to set it in place around windows, doors, edges or walls and secure the trim with nails or screws.
- Remove the siding near the J-channel for a secure fit and then put the siding back on.
We'll explain each of these techniques and why you might use them so that you know how to best proceed with fixing your home.
What Is J-Channel?
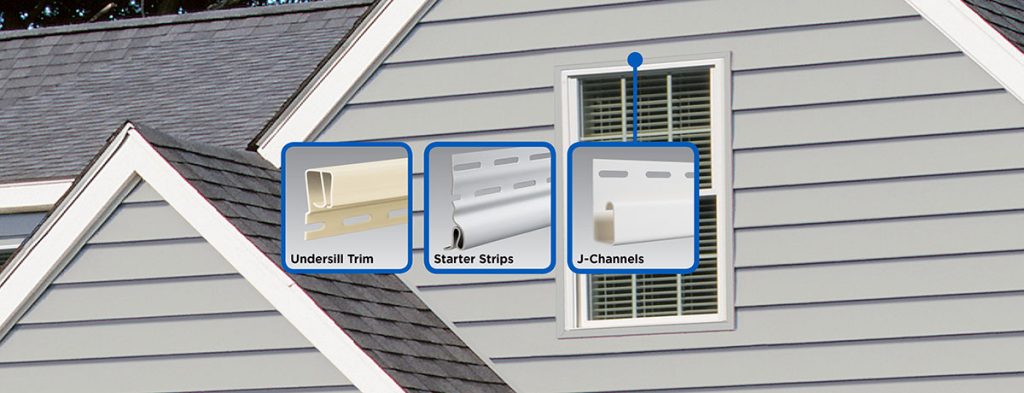
J-channel is a trim piece that makes vinyl siding look smooth and complete. These pieces generally go around corners for windows or doors and where the siding and roof meet. They smooth out your siding in these areas to make it all look even and complete.
The trim piece gets its name from its shape. When you view it from the side, it resembles a J shape. At the top of the trim are small holes for attaching it to your home without penetrating the trim. That way, you don't crack or harm the trim when installing it.
At the bottom of the J-channel, there is a curve, which helps hide the end of your vinyl siding. This creates a smooth and clean look around windows, doors or other areas of your home.
How to Install J-Channel Under Existing Siding
J-channel is easy to replace by using one of two methods. We'll explain both methods so that you can decide which meets your needs the best.
1. Install J-Channel Without Removing Siding
If your siding has cracks or breaks in it, you should not remove it to replace or install J-channel. Trying to remove damaged vinyl siding will make it weaker. To do avoid removing your siding, you'll trim the old J-channel off, trim the punctured edges off your new pieces and place it over the top edge.
- Remove the silicon that is holding the J-channel in place. You can use a utility knife to complete this step efficiently.
- Cut off the existing J-channel lengthwise.
- Cut the punctured edge of the new J-channel off. Don't worry, you won't need these punctured edges the way you're installing this J-channel with existing siding.
- Measure how long your replacement pieces of J-channel will need to be.
- Using heavy scissors or a saw, cut the J-channel lengthwise to meet your needs.
- Slide the J-channel in the place where the old J-channel used to be.
- To secure the new piece, use silicon in the gap under the J-channel.
Looking for Help with Your Siding Project?
2. Removing Vinyl Siding to Replace J-Channel
Alternatively, you can remove some of your vinyl siding to replace the J-channel. Here's a step-by-step method for completing this process.
What you'll need:
- Flat bar
- Hammer
- J-channel
- Nails
- Zip tool
Once you've gathered up the necessary materials, you're ready to begin the process of removing your vinyl siding to prepare for installing the J-channel.
- Evaluate which pieces of siding you'll need to remove to install your J-channel.
- Mark the areas for your J-channel with a marker.
- Nail your zip tool into the siding drum edge for the piece of siding you want to remove. If your siding is attached tightly, this might be difficult. Just remember, you don't want to crack or break your siding pieces as you'll be putting them back on your home once you're done.
- Once the zip tool is in place, push your siding downward while moving your zip tool horizontally along the siding.
- Slice the nail heads with your flat bar.
- Carefully remove all nails holding the siding in place.
- Slide the siding strips downward to remove them.
- Install the J-channel pieces so that they fit around windows and doors.
- Nail the J-channel into place using the holes provided.
- Inspect your siding pieces for any cracks or flaws. If the pieces have any issues, replace these pieces to protect your home.
- Re-attach your siding securely to your home.
How to Measure J-Channel
Measuring J-channel is important to ensure a snug fit against the other elements of your home's exterior. You'll need to measure around all doors, windows and corners as this is where J-channel is installed.
When measuring, start from the existing trim and don't forget about the expansion gap to make sure your J-channel doesn't crack during temperature changes.
J-Channel and Water Drainage
A problem with J-channel is that it can cause water damage if you install it incorrectly. That's because it traps the water instead of moving it away from your home. J-channel installs horizontally, which is how water can collect inside. If that water buildup becomes too much and begins to leak into your siding, that could mean water damage to your foundation.
Preventing vinyl siding J-channel water damage starts with quality underlayment to provide a water-resistant barrier. This helps prevent water from rotting your materials.
Additionally, you should install flashing beneath J-channel to prevent water from pooling. Or, you could caulk the J-channel seams and along the closed side of the channel near other elements, such as windows or doors.
To aid in drainage, miter the ends of your J-channel. This can prevent water from getting inside and ensure that it escapes properly. When you install J-channel over doors or windows, make sure the flanges lap down so that water can escape.
Finally, you might add holes in the edges of the J-channel to ensure the water can escape.
How To J-Channel a Window Perfectly Every Time – VIDEO Demonstration
J-Channel Installation FAQs
Learn more about installing J-channel and important considerations. We answer common questions related to J-channel installation.
Do You Overlap Vinyl J-Channel?
Yes, you should overlap J-channel pieces by about ¾ inch. This will allow for expansion and contraction so that your siding doesn't sag or buckle as the outside temperature changes.
What Is the Difference Between Flush Mount and J-Channel?
You can either install your siding flush with your windows or add a piece of trim known as J-channel. It depends on your style preferences. Flush-mount windows only require a piece of trim on the top window flange. These do not protrude from your windows. J-channel protrudes a bit.
Does J-Channel Match the Siding Color?
Normally homeowners prefer to match the J-channel to their siding color. However, you can use J-channel as an accent color, especially for corners. It all depends on your style preferences.
Expert J-Channel and Vinyl Siding Installation
Installing J-channel or vinyl siding on your home is not a do-it-yourself project. One small mistake could have serious consequences for your home's structure. Leave this work to the experts who will make sure your home's exterior provides essential protection from the elements.
2FL Windows, Siding and Roofing offers expert siding installation. But we'll also serve a consultative role in helping select the best materials and style to meet your needs. Schedule your free consultation to learn more.
Further reading:
- 7 Simple Steps To Replace Vinyl Windows Yourself
- How to Choose Vinyl Siding Colors
- The Best Vinyl Windows on the Market
- How Much Does Vinyl Window Replacement Cost?
How to Install Vinyl J Trim Around Windows
Source: https://2flwindowsandsiding.com/how-to-install-j-channel/